
By the end of this page, you will understand how code can make decisions, and use this to create a robot that can expertly work its way out of a maze, using sensors!
So far in our coding puzzles, our programs have really only been able to do a single task, such as move to a point or print some information. Reusing our previous recipe analogy, recipes might give different instructions based on some initial information (If using the optional basil, add it to the soup now for best flavour). We have a similar tool in our toolbox when writing Python programs: Conditionals.
IF
1
2
3
4
5
6
7
8
9
# Give me a number
x = int(input("Your number: "))

# Is x less than 10?
if x < 10:
    # It is! (Notice I'm *indented*)
    print("That is a pretty small number")

print(f"Your number was {x}.")
1
2
3
4
5
6
7
8
### Output ###
First run
>>> Your number: 11
>>> Your number was 11.
Second run
>>> Your number: 3
>>> That is a pretty small number
>>> Your number was 3.
The example above showcases the first of these conditionals. The if keyword is followed by an expression, the character :, and then a block of code that is indented with a tab (Indented just means you’ve got some empty space before the line). The indented block will only be run if the expression after the if keyword is true. So if x=3, then both prints would be run. And if x = 11, only the second print would be run because it is not indented.
While what x < 10 does is rather obvious, Python can evaluate many other expressions, such as the following:
x >= 10: Greater than or equal to (Written as> =).x == 10: Exactly equal to (Note the two=s, to make this expression different from setting variables (x = 10)).x < "abc": Ifxis a string, then is true ifxis lexically smaller.0 < x <= 10: x is larger than 0 but less than or equal to 10.
All of the above expressions evaluate to True or False. These values are data just like 5 or "word", and so can be stored in a variable for later use or comparison.
1
2
3
4
5
6
7
8
9
10
11
12
x = int(input("How old are you: "))

under_10 = x <= 10
over_18 = x >= 18

# This doesn't change the previous data
x = 20000

if over_18:
    print("You're quite the old student!")
if under_10:
    print("You're quite the young student!")
Colour and Ultrasonic Sensors
So far, you’ve just been running different code based on the input you supply. So let’s make this a bit more exciting and instead use the values of robot sensors in our conditionals.
Let’s start by adding these sensors to your testing bot. You can do this by pressing the pencil icon on the bot menu, and selecting the device button (White square with red circle) from the left hand sidebar.
Place a colour sensor, and set the port to in1. Next, place an ultrasonic sensor, and set the port to in2.
Now, as we did with the motors, we can integrate these devices into our programs.
1
2
3
4
5
6
7
8
9
10
11
12
13
14
15
from ev3sim.code_helpers import wait_for_tick
from ev3dev2.sensor import INPUT_1, INPUT_2
from ev3dev2.sensor.lego import ColorSensor, UltrasonicSensor

color = ColorSensor(INPUT_1)
ultrasonic = UltrasonicSensor(INPUT_2)

# Important!
wait_for_tick()

r, g, b = color.rgb
dist = ultrasonic.distance_centimeters

print(f"This colour sensor is reading Red:{r} Green:{g} Blue:{b}.")
print(f"This ultrasonic sensor thinks we are {dist}cm apart.")
Just like motors, we import the code we need (from ev3dev2...), initialise each device to a variable (ultrasonic = UltrasonicSensor(INPUT_2)), which we can use for commands and readings (dist = ultrasonic.distance_centimeters).
Each of these sensors really only has one data point of use, as shown in the example above:
color.rgbgives 3 values, the red, green and blue components in the colour it currently sees. You can save these values to three different variables using commas, as the example code does.ultrasonic.distance_centimetersgives a single value, the estimated distance to the nearest object, measured in centimetres.
Notice that we also needed to import wait_for_tick for this example and call it on line 9.
This is important. In the simulator, you should call wait_for_tick whenever you are about to start asking for sensor data. This ensures that sensor data is up to date. You’ll see more examples of this in the future.
One way computers encode colour is through RGB components. For example, your computer monitor is built up of many small red, green and blue lights. Colour is presented to your monitor by turning these three lights on to different amounts (Purple is equal parts red and blue).
The values returned by color.rgb aim to be somewhere from 0-255 in value, where 255 represents entirely on and 0 represents entirely off (So purple might be something like r=200, g=10, b=220). You can visualise this colour blend easily using any online colour picker such as this one. As you might see on that page, there are many different ways colour can be represented in text, but RGB is probably the simplest and is often used.
Now that we can get values from these sensors let’s use them to predict the colour we are looking at!
3 Colours (Red, Green, Blue) will flash onto the screen in a random order (They’ll flip between these every 2 seconds). So, using the colour sensor, you need to sense which of these 3 colours it is and print it!
You can access the puzzle here. Edit the code to complete the task (You can use time.sleep(2) to wait for 2 seconds.)
The colour is most likely red if the red value is larger than the green and blue values: r > g + b
ELSE
That’s not the only tool we have however. Often you want to also do something if the expression is false:
1
2
3
4
5
6
7
8
# Give me a number
x = int(input("Your number: "))

if x < 10:
    print("That is a pretty small number")
else:
    print("That is a respectably sized number")
print(f"Your number was {x}.")
1
2
3
4
5
6
7
8
9
### Output ###
First run
>>> Your number: 32
>>> That is a respectably sized number
>>> Your number was 32.
Second run
>>> Your number: 7
>>> That is a pretty small number
>>> Your number was 7.
The rules for this keyword are very similar. After the first indented block, you can add the else keyword, the character :, and then another indented block. This block then only gets run when the first statement is not true (aka false!).
IF IF IF
Not only do we have these tools, but because the indented blocks are just snippets of code, we can add more if statements in the blocks and indent further to check multiple expressions:
Part 1: Understand what the following code is doing, and then run it on your robot to confirm:
1
2
3
4
5
6
7
8
9
10
11
12
13
14
password = "open sesame"

treasure = "Here is your treasure!"

attempt1 = input("What's the password? ")
if attempt1 == password:
    print(treasure)
else:
    print("Try again!")
    attempt2 = input("What's the password? ")
    if attempt2 == password:
        print(treasure)
    else:
        print("You fail! This program will self destruct in 5, 4, 3 ...")
Part 2: How would we change the code to allow for 3 attempts, rather than 2?
Jeremy is simulating a popular arcade game called Pachinko. You get different prizes based on the coloured slots that the ball falls into.
Jeremy has written some code to automate this process and tell the user which prize they get. However, currently, it has 3 bugs that need fixing. Are you up for the task?
You can download the puzzle here.
The first problem is that any prize in slot 20 or more is being reported as a teensy prize. This is because the print for teensy is not in an else, so it is printed whenever position <= 19 is False.
ELIF
Moving our code to the right (indenting) everytime we nest conditionals can be a bit annoying though. For this we have yet another tool:
1
2
3
4
5
6
7
8
9
10
11
12
# Give me a number
x = int(input("Your number: "))

if x < 10:
    print("That is a pretty small number")
elif x <= 20:
    print("That is a respectably sized number")
elif x <= 30:
    print("Getting bigger")
else:
    print("That number is truly massive")
print(f"Your number was {x}.")
1
2
3
4
5
6
7
8
9
### Output ###
First run
>>> Your number: 32
>>> That number is truly massive
>>> Your number was 32.
Second run
>>> Your number: 25
>>> Getting bigger
>>> Your number was 25.
The elif keyword (Shortening of else then if) can be placed after the indented block of an if statement or another elif statement. The indented block after an elif keyword is run only if the expression after the elif keyword is True, and all other previous expressions (in the elif or if statements above) are false. Note that this only checks up until the first if statement it spots:
1
2
3
4
5
6
7
8
9
10
11
12
13
# Give me a number
x = int(input("Your number: "))

if True:
    print("I get printed!")
if x < 10:
    print("I get printed if x < 10")
elif x == 32:
    # Only checks up to x < 10
    print("I get printed if x == 32")
elif x == 32:
    # If x==32, then the first `elif` is executed, not me :(
    print("I don't :(")
1
2
3
4
5
6
7
8
9
### Output ###
First run
>>> Your number: 3
>>> I get printed!
>>> I get printed if x < 10
Second run
>>> Your number: 32
>>> I get printed!
>>> I get printed if x == 32
Rewrite the solution code you had for Pachinko so that no line is indented more than once (Use elif!)
You are meeting a new alien race and don’t want to be too close or too far away, so you can have a conversation.
Using an ultrasonic sensor and your motors, ensure you move to about 20 centimetres away from the alien.
You can download the puzzle here.

AND OR NOT?
One last tool in our toolbox is the terms and, or and not. These give us a way to combine or modify expressions to make code easier to read.
1
2
3
4
5
6
7
8
9
10
11
12
13
14
15
16
17
18
19
20
21
22
23
24
25
26
27
28
29
30
31
32
33
34
35
36
37
38
39
40
41
42
expression_1 = False
expression_2 = True

### TOOL 1: The `and` keyword.

# Long way
if expression_1:
    if expression_2:
        # I only get run if both are true.
        print("AND!")

# Is the same as
if expression_1 and expression_2:
    print("AND!")

### TOOL 2: The `or` keyword.

# Long way
correct = False
if expression_1:
    correct = True
if expression_2:
    correct = True
if correct:
    # I only get run if either (or both) are true.
    print("OR!")

# Is the same as
if expression_1 or expression_2:
    print("OR!")

### TOOL 3: The `not` keyword.

# Long way
if expression_1:
    pass # do nothing
else:
    print("NOT!")

# Is the same as
if not expression_1:
    print("NOT!")
1
2
3
4
5
### Output ###
>>> OR!
>>> OR!
>>> NOT!
>>> NOT!
You can download the project here.
The project you downloaded should spawn a robot in the top left corner of a maze. The maze rules are simple. There are three coloured squares at the bottom of the maze, each of these squares has 3 corresponding buttons, although only one of them works. The location of the working button is dependant on the colour of the square. A blue square will have a working button just above, a green square will have the button slightly higher up, and a red square will have the button all the way to the top of the maze. All three buttons must be pushed (Your robot should go on top of them) for the exit at the bottom right of the maze to open up.
To make the process a bit less tedious, here are some measurements of the field:
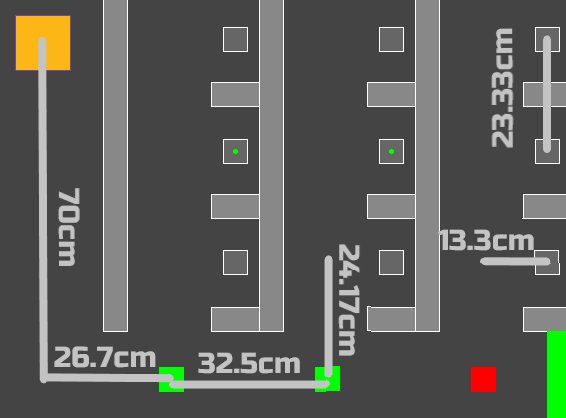
Edit the code to complete the maze!
First try moving to the first coloured square, and printing its colour (red, green or blue). Use the color.rgb values to determine which colour it is. Do you get the colour values you expect? You might need to wait a bit before getting color.rgb by using time.sleep(0.1).